
Posted on November 4, 2023
The Role and Advantages of Vertical Grow Rack Systems: Revolutionizing Plant Cultivation
Vertical grow rack systems have emerged as a game-changing solution in the field of plant cultivation. These innovative systems utilize vertical space to create efficient and productive growing environments. With the ability to stack plants vertically, these systems offer numerous advantages, including maximizing space utilization, increasing crop yield, optimizing resource efficiency, enhancing scalability, and promoting sustainable farming practices. In this article, we will delve into the role and benefits of vertical grow rack systems, highlighting their impact on modern plant cultivation.
Space Utilization and Density
Vertical grow rack systems play a pivotal role in optimizing space utilization for plant cultivation. With traditional horizontal methods, limited floor space often restricts the number of plants that can be grown. However, vertical racks utilize the vertical dimension, effectively multiplying the growing area. By stacking multiple levels of growing surfaces, these systems allow growers to cultivate a significantly higher number of plants in a smaller footprint. This space optimization is particularly advantageous in urban environments or areas with limited available land.
Increased Crop Yield
One of the primary advantages of vertical grow rack systems is the potential for increased crop yield. By utilizing vertical space and stacking plants closely together, these systems maximize light exposure and facilitate efficient airflow. This optimized environment promotes healthier and more vigorous plant growth, resulting in higher yields. Additionally, vertical grow racks enable growers to implement advanced lighting systems, such as LED technology, which can provide tailored light spectra and intensity for different plant growth stages, further enhancing productivity.
Resource Efficiency
Vertical grow rack systems are designed to optimize resource efficiency, making them a sustainable choice for plant cultivation. These systems enable precise resource management, including water, nutrients, and energy. By utilizing targeted irrigation systems such as drip irrigation or hydroponics, growers can deliver water and nutrients directly to the plants, minimizing wastage. The controlled environment within the racks also reduces the need for excessive pesticide use, as the confined space makes pest management more manageable. This resource efficiency contributes to water conservation, reduced chemical inputs, and overall sustainability.
Scalability and Flexibility
Vertical grow rack systems offer exceptional scalability and flexibility to growers. The modular design of these systems allows for easy expansion or reconfiguration as the cultivation needs evolve. Growers can add or remove racks, adjust the height between levels, or rearrange the layout to accommodate varying plant sizes or growth requirements. This adaptability provides growers with the ability to scale up production and meet changing market demands without the need for extensive infrastructure changes or additional land.
Year-Round Cultivation
Vertical grow rack systems facilitate year-round cultivation, overcoming limitations imposed by seasonal changes. By incorporating artificial lighting and environmental controls, growers can create a consistent and optimal growth environment for plants. This enables cultivation regardless of external factors such as daylight duration or adverse weather conditions. The ability to control temperature, humidity, and other environmental parameters within the rack system ensures continuous plant growth and a reliable supply of fresh produce throughout the year.
Enhanced Plant Health and Quality
The controlled environment within vertical grow rack systems promotes plant health and quality. The reduced risk of pests and diseases, along with optimized airflow and lighting conditions, results in healthier plants with improved nutrient uptake and disease resistance. Additionally, the controlled environment helps maintain consistent growing conditions, leading to uniform growth and high-quality produce. These factors are particularly beneficial for niche or specialty crops where quality and consistency are paramount.
Vertical grow rack systems have revolutionized plant cultivation by maximizing space utilization, increasing crop yield, optimizing resource efficiency, and offering scalability. These systems provide a sustainable solution for year-round cultivation, promoting efficient resource management and minimizing environmental impact. As the demand for fresh produce grows, vertical grow rack systems offer a viable option for growers to maximize productivity in limited spaces while maintaining high-quality crop output. With their ability to create controlled environments, these systems are shaping the future of modern agriculture and horticulture.

Posted on November 3, 2023
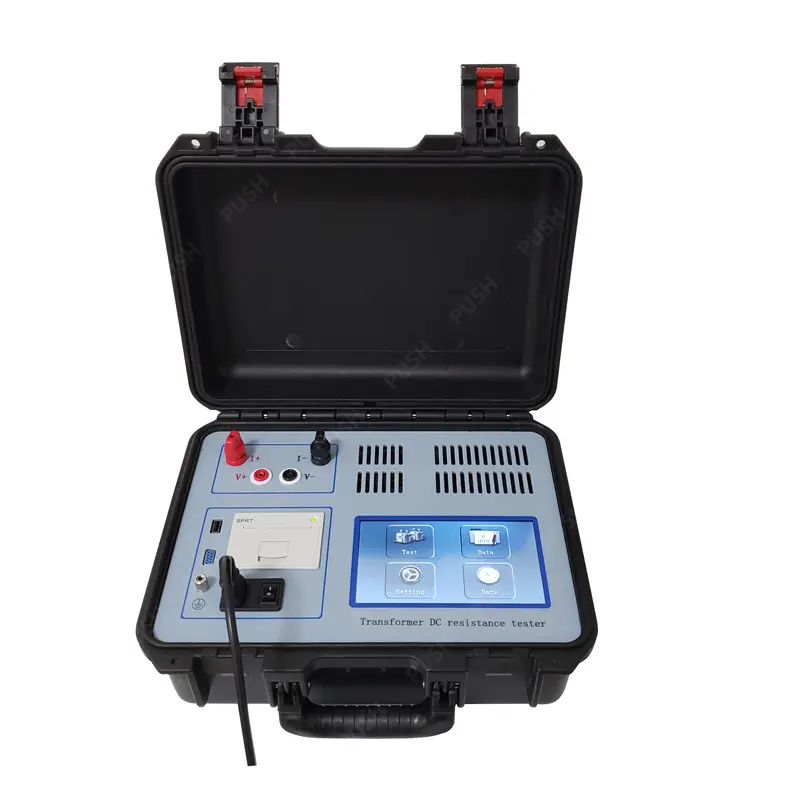
How often should earth resistance testing be performed in electrical installations?
The frequency of earth resistance testing in electrical installations depends on various factors, including local regulations, industry standards, the specific type of installation, and the criticality of the electrical system.
Here are some general guidelines:
- Initial Testing: Earth resistance testing is typically performed during the initial commissioning of an electrical installation. This ensures that the grounding system is correctly installed and complies with safety standards and regulations.
- Regular Periodic Testing: After the initial testing, regular periodic testing is recommended to ensure the continued effectiveness of the grounding system. The frequency of periodic testing can vary but is often conducted at intervals of one to three years.
- Major Changes or Maintenance: Whenever there are significant modifications to the electrical system or the grounding infrastructure, it’s advisable to perform earth resistance testing to ensure that the changes have not negatively impacted the grounding system’s performance.
- After Lightning Strikes or Faults: In cases where a lightning strike or electrical fault occurs, it is important to conduct earth resistance testing to verify that the grounding system remains intact and effective. Lightning strikes can damage ground electrodes and conductors.
- Environmental Changes: If the installation site experiences significant changes in soil conditions or the introduction of new conductive materials (e.g., pipelines), retesting may be necessary to account for these changes.
- Highly Critical Installations: In installations where electrical continuity and grounding are crucial for safety or operational reasons, more frequent testing may be necessary, potentially on an annual basis or even more often.
- Regulatory Requirements: Compliance with local regulations and industry standards is essential. Some jurisdictions or standards bodies may specify the frequency of earth resistance testing for certain types of installations.
- Manufacturer Recommendations: In some cases, equipment manufacturers may recommend specific testing frequencies as part of their maintenance guidelines.
It’s important to note that the frequency of earth resistance testing should always be based on a risk assessment, taking into account the potential consequences of inadequate grounding, the criticality of the electrical installation, and any applicable regulatory requirements.
Ultimately, regular earth resistance testing helps ensure the safety and reliability of the electrical system by identifying and addressing grounding issues promptly. It is essential to document all test results and maintenance actions taken to maintain the integrity of the grounding system and demonstrate compliance with relevant standards and regulations.
What are the applications and significance of measuring earth resistance in electrical systems and grounding?
Measuring earth resistance in electrical systems and grounding is crucial for ensuring the safety, reliability, and performance of electrical installations.
Here are the key applications and significance of earth resistance measurements:
Applications:
- Safety: Earth resistance measurements help verify that the grounding system is functioning effectively, reducing the risk of electric shock and ensuring the safety of personnel and equipment.
- Ground Fault Protection: Earth resistance testing is essential for ground fault protection devices (GFPDs) and ground fault circuit interrupters (GFCIs) to operate correctly.
- Lightning Protection: Proper grounding is crucial for diverting lightning strikes and preventing damage to structures and equipment. Earth resistance measurements help ensure that the grounding system can effectively dissipate lightning-induced surges.
- Electromagnetic Compatibility (EMC): Grounding plays a key role in reducing electromagnetic interference (EMI) and radiofrequency interference (RFI). Accurate earth resistance measurements help maintain EMC and minimize signal interference.
- Power Quality: Grounding is essential for maintaining power quality, reducing voltage fluctuations, and improving the overall performance of electrical systems.
- Fault Location: In the event of a fault or ground fault, earth resistance measurements can be used to locate the fault’s position in underground cables or electrical networks.
- Electrostatic Discharge (ESD) Protection: Grounding is vital for preventing electrostatic discharge, particularly in sensitive electronic manufacturing environments. Earth resistance measurements ensure that grounding systems meet ESD protection requirements.
- Substation Grounding: Earth resistance testing is integral in substation design and maintenance, ensuring that substations are properly grounded for the safety and reliability of the power distribution network.
Significance:
- Safety: Ensures the safety of personnel by providing a low-resistance path for fault currents to dissipate, reducing the risk of electric shock and fire hazards.
- Protection Against Lightning: A low-resistance grounding system helps protect structures and equipment from lightning strikes, reducing the potential for damage.
- Continuity of Electrical Supply: Proper grounding minimizes power interruptions caused by equipment failures and allows for the reliable operation of electrical systems.
- Ground Fault Protection: Facilitates the correct operation of ground fault protection devices, ensuring that faulty equipment is quickly disconnected from the power supply.
- Power Quality: Maintains stable and clean power, earth resistance tester reducing voltage fluctuations and preventing electrical noise that can affect sensitive equipment.
- Compliance with Standards: Ensures compliance with local, national, and international standards and regulations related to grounding and safety.
- Preventive Maintenance: Regular earth resistance testing allows for the early detection of deteriorating grounding systems, enabling proactive maintenance to avoid unexpected failures.
- Optimizing Equipment Performance: Proper grounding can extend the lifespan and optimize the performance of electrical and electronic equipment.
In summary, measuring earth resistance is fundamental for maintaining a safe and reliable electrical system, protecting against electrical hazards, and ensuring compliance with industry standards. It plays a critical role in enhancing safety, equipment longevity, and the overall performance of electrical installations.
Posted on November 3, 2023
What safety precautions should be followed when using circuit breaker testers, especially in high-voltage environments?
Using circuit breaker testers, especially in high-voltage environments, requires strict adherence to safety precautions to protect personnel and equipment.
Here are important safety guidelines to follow:
- Training and Qualifications:
- Ensure that personnel operating circuit breaker testers are properly trained and qualified for the task. They should understand the equipment, testing procedures, and safety protocols.
- PPE (Personal Protective Equipment):
- Wear appropriate personal protective equipment, including safety glasses, gloves, and flame-resistant clothing. In high-voltage environments, additional PPE may be necessary, such as arc flash suits and face shields.
- Electrical Safety Procedures:
- Verify that the circuit breaker is de-energized and isolated from the power source before conducting any tests. Follow lockout/tagout procedures to prevent accidental energization.
- Grounding:
- Establish proper grounding to minimize the risk of electric shock and to provide a safe path for fault currents. Ensure that the grounding connections are secure and effective.
- Voltage Measurement:
- Before testing, use a voltage detector to confirm that the circuit is de-energized. Double-check the absence of voltage to eliminate the possibility of residual energy.
- Test Environment:
- Perform tests in a controlled and secure environment to prevent unauthorized access and protect personnel from potential hazards. Clear the area of non-essential personnel.
- Safety Interlocks:
- Use circuit breaker testers equipped with safety interlocks and built-in safety features. Ensure that these interlocks are functional and not bypassed.
- Insulation:
- Check the insulation of test leads, cables, and the tester itself to ensure they are in good condition and rated for the voltage being tested.
- Arc Flash Protection:
- In high-voltage environments, be aware of the potential for arc flash events. Use arc flash protective clothing and equipment as necessary and in accordance with relevant standards.
- Proper Tools and Equipment:
- Use high-quality, well-maintained test equipment and tools. Faulty equipment can pose a safety risk.
- Documentation:
- Maintain comprehensive records of all tests and their results. This documentation can be critical for future maintenance and safety assessments.
- Emergency Response:
- Have a well-defined emergency response plan in place in case of accidents or unexpected events. Ensure that all personnel know how to respond to various emergency scenarios.
- Compliance with Standards:
- Follow safety standards and guidelines relevant to the specific testing environment, such as those from organizations like ANSI, IEEE, and NFPA.
- Continuous Monitoring:
- Continuously monitor the testing process and the surrounding environment for any signs of trouble, such as abnormal sounds or unusual odors.
- Post-Test Verification:
- After testing, verify that the circuit breaker and associated components have been properly restored and that the equipment remains in a safe condition.
Safety is of utmost importance when working with circuit breaker testers, particularly in high-voltage situations. Always prioritize the well-being of personnel and ensure that testing procedures are conducted in accordance with industry best practices and safety standards.
How can circuit breaker testers be used to evaluate the performance and condition of circuit breakers in power distribution systems?
Circuit breaker testers are essential tools for evaluating the performance and condition of circuit breakers in power distribution systems.
Here are the key steps and procedures for using these testers effectively:
- Preparation:
- Ensure that the circuit breaker is de-energized and properly isolated before testing. Follow lockout/tagout procedures to prevent accidental energization.
- Visual Inspection:
- Examine the circuit breaker visually to check for any obvious signs of damage, corrosion, loose connections, or worn parts.
- Timing and Motion Analysis:
- Use the circuit breaker tester to measure the timing and motion of the circuit breaker’s opening and closing operations. circuit breaker tester Timing analysis helps determine if the breaker operates within specified time limits.
- Contact Resistance Measurement:
- Measure the contact resistance of the breaker’s contacts using the tester. Elevated contact resistance can indicate worn or damaged contacts that may not conduct current properly.
- Operational Testing:
- Test the breaker’s performance under various operating conditions. This may include testing at different loads and checking the breaker’s response to fault conditions.
- Insulation Resistance Testing:
- Measure the insulation resistance of the circuit breaker to identify any insulation issues, which could lead to faults or reduced performance.
- Overcurrent and Short-Circuit Testing:
- Use the circuit breaker tester to apply overcurrent or short-circuit conditions to evaluate the breaker’s ability to interrupt current safely and reliably.
- Contact Travel Analysis:
- Analyze the travel characteristics of the circuit breaker’s contacts to ensure they make and break connections as intended.
- Vibration and Shock Testing:
- Subject the circuit breaker to vibration and shock tests to assess its ability to withstand mechanical stress, such as in seismic-prone areas.
- Partial Discharge Detection:
- Employ the circuit breaker tester to detect partial discharges within the breaker, which can be indicative of insulation breakdown.
- Recovery Voltage Measurement:
- Measure the recovery voltage across the breaker contacts after interruption to ensure it remains within specified limits.
- Documentation and Data Analysis:
- Record all test results and data for future reference and analysis. Comprehensive documentation is crucial for assessing the breaker’s condition and making informed decisions.
- Comparison with Manufacturer Specifications:
- Compare the test results with the manufacturer’s specifications and industry standards to determine if the circuit breaker meets the required performance criteria.
- Maintenance and Repair:
- If any issues are identified during testing, schedule appropriate maintenance or repairs to rectify the problems and ensure the circuit breaker’s reliability.
- Post-Test Verification:
- After maintenance or repairs, retest the circuit breaker to confirm that it meets the required performance standards.
Circuit breaker testers provide valuable insights into the condition and performance of circuit breakers, helping to ensure the reliability of power distribution systems. Regular testing and maintenance are essential to prevent unexpected failures and to maintain the safety and efficiency of electrical networks.

Posted on October 19, 2023
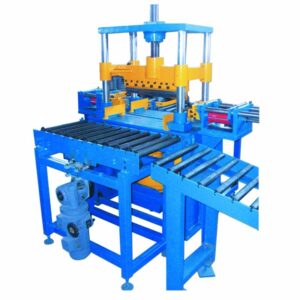
What are the common maintenance and servicing requirements for a block making machine to ensure its optimal performance?
Proper maintenance and servicing are essential to ensure the optimal performance and longevity of a block making machine. Regular maintenance helps prevent breakdowns, reduces downtime, and ensures the quality of the blocks or bricks produced.
Here are some common maintenance and servicing requirements for block making machines:
- Cleaning and Lubrication:
- Regularly clean the machine, including the molds, hoppers, and conveyors, to remove debris, concrete residue, and dirt.
- Lubricate moving parts, such as bearings, chains, and rollers, as specified in the machine’s maintenance manual. Use the recommended lubricants to prevent wear and friction.
- Inspecting Electrical Components:
- Inspect and test electrical components, such as wiring, switches, and control panels, for loose connections, damaged wires, or signs of overheating.
- Ensure that safety features, such as emergency stop buttons, are functioning correctly.
- Checking Hydraulic Systems:
- Check the hydraulic system for leaks, worn hoses, and damaged seals.
- Monitor hydraulic fluid levels and quality and replace or top up the hydraulic fluid as needed.
- Mold Maintenance:
- Inspect molds for wear and damage. Replace or repair molds that are no longer in good condition.
- Keep molds clean and lubricated to prevent concrete from sticking and affecting block quality.
- Vibration System Maintenance:
- Check the vibration system to ensure that it is operating correctly. Inspect vibration motors and vibrators for damage.
- Calibrate the vibration system to maintain consistent compaction of blocks.
- Belt and Conveyor Maintenance:
- Inspect conveyor belts and chains for wear and alignment issues. Replace or adjust components as needed.
- Clean and lubricate conveyor systems to ensure smooth material movement.
- Regular Calibration:
- Periodically calibrate the machine to maintain the desired block or brick dimensions and quality.
- Inspecting Bolts and Fasteners:
- Check all nuts, bolts, and fasteners for tightness. Re-tighten or replace any that have loosened.
- Wear Parts Replacement:
- Regularly replace wear parts, such as mold liners, wear plates, and cutting edges, to maintain the quality of the blocks and the efficiency of the machine.
- Training and Operator Competence:
- Ensure that machine operators are well-trained and competent in machine operation and maintenance tasks.
- Scheduled Maintenance Plans:
- Develop a maintenance schedule or plan that specifies routine maintenance tasks, intervals, and responsible personnel.
- Consult the Machine’s Manual:
- Follow the manufacturer’s guidelines and recommendations outlined in the machine’s manual for maintenance and servicing.
- Safety Inspections:
- Conduct safety inspections to identify and address potential hazards and ensure compliance with safety standards and regulations.
- Record Keeping:
- Maintain records of maintenance and servicing activities, including dates, tasks performed, and replacement parts used.
It’s important to note that the specific maintenance requirements may vary depending on the brand and model of the block making machine. Manufacturers often provide detailed maintenance guidelines and schedules that should be closely followed. Additionally, preventative maintenance and routine inspections are key to addressing issues before they become major problems, helping to extend the life and reliability of the machine.
How does the size and capacity of a block making machine affect its production output?
The size and capacity of a block making machine have a direct impact on its production output. These factors play a crucial role in determining how many blocks or bricks can be produced within a specific timeframe.
Here’s how the size and capacity affect production output:
- Mold Size and Quantity:
- Larger machines can accommodate larger molds. The size of the molds determines the dimensions of the blocks or bricks produced. Machines with larger molds can create larger and more blocks with each cycle.
- Some block making machines have multiple mold cavities. A machine with more mold cavities can produce more blocks simultaneously, increasing the output.
- Cycle Time:
- The cycle time refers to the time it takes for the machine to complete one production cycle, including filling the mold, compacting the material, and ejecting the finished blocks. Smaller machines often have shorter cycle times.
- Larger, high-capacity machines may have longer cycle times due to the larger amount of material to be processed and compacted.
- Production Rate:
- The production rate is determined by the number of blocks or bricks produced per hour. Larger machines with higher capacities typically have higher production rates because they can process more material in a given timeframe.
- Batch Size:
- Some block making machines operate in batch mode, meaning they produce a set number of blocks or bricks in each cycle. China block machine The batch size can vary depending on the machine’s design and capacity.
- Larger machines usually have larger batch sizes, contributing to higher overall production output.
- Automation and Conveyor Systems:
- Larger machines often feature more automation and conveyor systems, which can streamline the production process. Automated feeding and block ejection mechanisms can improve efficiency and output.
- Resource Requirements:
- Larger machines may require a greater quantity of raw materials, such as concrete or clay, to meet their capacity. This should be considered in production planning to ensure a steady supply of materials.
- Space and Infrastructure:
- The size of the machine also affects the space and infrastructure requirements. Larger machines may need more space and robust foundations to support their weight and vibration.
- Project Scale:
- The choice of machine size and capacity should align with the scale of the construction project. Smaller machines may be suitable for small-scale projects, while larger machines are better suited for large construction projects.
- Versatility:
- Smaller machines are often more versatile and adaptable to different block sizes and types, making them suitable for projects with varied requirements.
In summary, the size and capacity of a block making machine impact its production output by determining the block dimensions, cycle time, production rate, and resource requirements. The selection of a machine should be based on the specific needs and scale of the construction project, ensuring that the machine’s capacity aligns with the demand for blocks or bricks. Additionally, factors like automation, maintenance, and raw material supply should be considered to optimize production output.
Posted on October 19, 2023
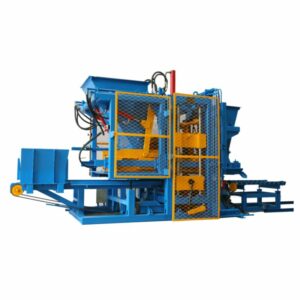
How does the choice of raw materials, such as concrete or clay, impact the operation and output of a block making machine?
The choice of raw materials, such as concrete or clay, significantly impacts the operation and output of a block making machine.
Here’s how the choice of raw materials affects the block making process:
1. Raw Material Properties:
- Concrete: Concrete blocks are typically made from a mixture of cement, sand, and aggregate. The properties of the concrete, including the type and ratio of these materials, influence the strength, durability, and appearance of the blocks.
- Clay: Clay bricks or blocks are made from natural clay. The composition, quality, and characteristics of the clay play a crucial role in the final product’s texture, color, and firing requirements.
2. Manufacturing Process:
- Concrete: The production of concrete blocks involves mixing the raw materials with water and then compacting and curing the mixture in molds. The curing process can vary, including air curing, steam curing, or autoclave curing, depending on the type of block being produced.
- Clay: Clay blocks or bricks are formed through molding, drying, and firing in kilns. The firing process at high temperatures gives clay blocks their structural integrity.
3. Block or Brick Type:
- Concrete: Concrete is versatile and allows for the production of various block types, including solid blocks, hollow blocks, interlocking blocks, and decorative blocks. The choice of concrete mix design and mold design can produce different block types.
- Clay: Clay is primarily used for manufacturing traditional clay bricks, which come in standard sizes and shapes. Clay blocks are typically solid, with fewer variations in design.
4. Appearance and Texture:
- Concrete: Concrete blocks can be customized for various appearances, such as smooth surfaces or textured finishes. The choice of aggregates and molds can impact the appearance and texture of the final product.
- Clay: Clay bricks have a natural, earthy appearance and often exhibit variations in color and texture due to the firing process. China block machinery They are known for their classic aesthetic appeal.
5. Strength and Durability:
- Concrete: Concrete blocks are known for their strength and durability, making them suitable for load-bearing and structural applications. The use of high-quality concrete and proper curing methods is crucial for achieving the desired strength.
- Clay: Clay blocks are also durable, with good compressive strength. They are used in both load-bearing and non-load-bearing applications.
6. Environmental Impact:
- Concrete: The production of concrete blocks may have a higher environmental impact due to the energy-intensive processes involved, including cement production. However, the use of recycled materials can mitigate some of these environmental concerns.
- Clay: Clay is a natural and abundant resource, and clay blocks are considered more environmentally friendly in terms of raw material availability.
In summary, the choice of raw materials impacts the characteristics, appearance, and performance of the blocks or bricks produced by a block making machine. Engineers, architects, and builders select the type of block or brick based on the specific requirements of the construction project and the desired aesthetic and structural features. Both concrete and clay blocks have their unique advantages and can be tailored to meet various construction needs.
Are there variations of block making machines designed for specific applications, such as making interlocking bricks or specialized shapes?
Yes, there are variations of block making machines designed for specific applications, including the production of interlocking bricks and specialized shapes. These machines are tailored to meet the unique requirements of various construction projects and design preferences. Here are some examples:
- Interlocking Brick Making Machines:
- Paver Block Machines: These machines are specifically designed to produce interlocking pavers or paving stones. They create bricks with unique interlocking patterns that don’t require mortar for installation, making them ideal for pathways, driveways, and hardscape applications.
- Hollow Interlocking Brick Machines: These machines produce interlocking bricks with hollow cores. The interlocking design enhances stability and load-bearing capacity, making them suitable for construction projects where strength and aesthetics are essential.
- Specialized Shape and Size Machines:
- Wave Block Machines: Some block making machines are engineered to create wave-shaped blocks. These blocks are used for decorative purposes, adding texture and visual interest to walls, facades, and landscaping features.
- Slope Block Machines: These machines produce blocks with sloping faces. Slope blocks are often used in terracing and landscaping projects to create retaining walls that can adapt to varying slopes and topographies.
- Corner Block Machines: Block making machines designed for corner blocks produce blocks with a 90-degree bend. These are used in the construction of corners in walls, making the process more efficient and precise.
- Modular and Customizable Machines:
- Some block making machine manufacturers offer modular and customizable designs. These machines can be configured to produce various block sizes and shapes by changing molds or attachments. This flexibility allows them to adapt to diverse construction requirements.
- Compressed Earth Block (CEB) Machines:
- CEB machines are specialized for making compressed earth blocks from natural materials like soil, sand, and a small percentage of cement. These blocks are sustainable and are used for environmentally friendly and cost-effective construction.
- Aerated Concrete Block Machines:
- Machines designed for aerated concrete blocks produce lightweight, insulating blocks with high thermal properties. These blocks are commonly used in energy-efficient building construction.
- Decorative Block Machines:
- Block making machines with decorative block molds are used to create ornamental or decorative blocks for architectural purposes, such as facades, garden walls, and interior design.
- Recycled Material Block Machines:
- Some block making machines are adapted to use recycled materials like crushed glass or plastic as a component in block production, promoting sustainability and waste reduction.
These specialized block making machines cater to the diverse needs of construction projects, from aesthetic considerations to structural requirements. The choice of the machine depends on the specific application, desired block type, and project objectives. It’s important to select a machine that aligns with the project’s design and performance criteria.
Posted on September 26, 2023
Which material is the most durable for custom metal logo tag for bag?
When it comes to durability for custom metal logo tags for bag, stainless steel is commonly considered one of the most robust materials. Stainless steel offers several advantages that contribute to its durability:
Corrosion Resistance:
Stainless steel is highly resistant to corrosion, making it suitable for various environments and conditions. It can withstand exposure to moisture, humidity, and other corrosive elements, ensuring the logo tag retains its appearance and structural integrity over time.
Strength and Sturdiness:
Stainless steel is a strong and sturdy material, providing durability and resistance to bending or breaking. It can withstand the rigors of daily use, including handling, opening, and closing of bags without compromising its structural integrity.

Scratch and Wear Resistance:
Stainless steel is known for its excellent resistance to scratches, dents, and general wear. This durability ensures that the logo tag maintains its visual appeal and legibility, even with regular use and potential contact with other objects.
Longevity:
Stainless steel logo tags have a long lifespan, offering enduring durability. They can withstand repeated use and exposure to various weather conditions without significant degradation, making them suitable for bags that are intended for long-term use.
Retention of Appearance:
Stainless steel logo tags retain their appearance well over time. They are resistant to fading, discoloration, or tarnishing, ensuring that the logo remains visible and attractive on the bag for an extended period.
While stainless steel is known for its durability, it’s important to consider other factors such as design, size, attachment method, and overall bag usage. These factors can also influence the logo tag’s longevity and durability. Additionally, proper care and maintenance, such as regular cleaning and avoiding abrasive substances, can help preserve the logo tag’s appearance and durability.
Posted on September 12, 2023
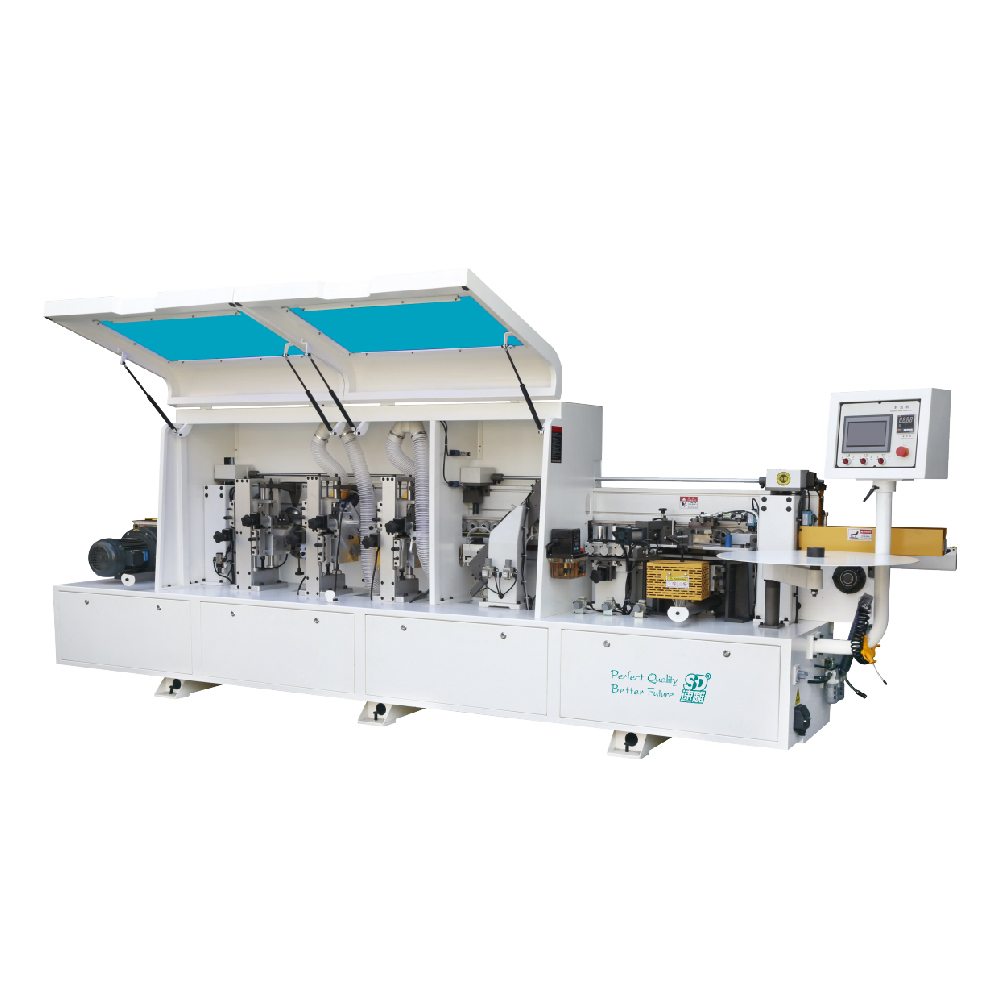
How does the cost of an edge tape machine vary based on its features and capabilities?
The cost of an edge tape machine can vary based on several factors related to its features and capabilities.
Here are some factors that can influence the price range:
Machine Type: There are different types of edge tape machines available, including manual, semi-automatic, and fully automatic machines. Manual machines are typically less expensive compared to automated machines due to their simpler design and fewer features.
Automation Level: The level of automation and the machine’s capabilities can significantly impact its cost. Fully automatic machines that can perform tasks such as tape feeding, trimming, and finishing without much manual intervention tend to be more expensive than machines that require more manual input.
Capacity and Speed: Machines with higher production capacities and faster operational speeds often come at a higher price. If you require a machine that can handle large volumes of edge tape application quickly, it may come with a higher cost.
Precision and Accuracy: Machines that offer precise and accurate edge tape application, trimming, and finishing may have advanced features and components, such as laser alignment systems or computerized controls. These additional features can increase the cost of the machine.
Material Compatibility: Edge tape machines designed to work with a wide range of materials, such as various types of wood, plastic, or metal, may have more versatility and adaptability. Machines with broader material compatibility tend to be more expensive due to the complexity of their design and engineering.
Brand and Reputation: Established brands with a reputation for quality and reliability may command higher prices for their edge tape machines. These brands often invest in research and development, ensuring their machines meet industry standards and customer expectations.
Additional Features: Certain additional features or options, such as integrated dust collection systems, digital controls, touch screens, or custom configuration options, can contribute to the overall cost of the machine.
After-sales Support and Service: The level of customer support, warranty, and service offered by the manufacturer can also impact the cost. Machines from manufacturers that provide comprehensive support and service may have a higher initial price but offer long-term value.
It’s essential to consider your specific requirements, production needs, and budget when evaluating the cost of an edge tape machine. Carefully assess the features and capabilities that align with your needs to make an informed decision. It’s also recommended to compare prices from different manufacturers or suppliers to get a better understanding of the market range for edge tape machines.
What features should be considered when selecting an edge tape machine?
When selecting an edge tape machine, several features should be considered to ensure it meets your specific requirements and production needs.
Here are some important features to consider:
Tape Thickness and Width Capacity: The machine should be capable of handling the tape thickness and width that you commonly work with. Check the specifications of the machine to ensure it can accommodate the range of tape sizes you require.
Automation Level: Determine the level of automation you need based on your production volume and workflow. edge tape machine Manual machines require more manual input, while semi-automatic and fully automatic machines offer varying degrees of automation in tape feeding, trimming, and finishing processes.
Speed and Production Capacity: Consider the operational speed and production capacity of the machine. Choose a machine that can keep up with your desired production output without compromising quality.
Material Compatibility: Ensure that the machine is compatible with the materials you work with, such as wood, plastic, or metal. It should be able to handle the specific material thickness and characteristics effectively.
Edge Quality and Finish: Evaluate the machine’s ability to deliver precise and clean edge tape application, trimming, and finishing. Look for features like adjustable trimming units, precision guides, or laser alignment systems that contribute to high-quality edge finishing.
Ease of Use and User Interface: Consider the user-friendliness of the machine. A clear and intuitive user interface can contribute to smoother operation and minimize the learning curve for operators.
Maintenance and Serviceability: Assess the ease of maintenance and availability of spare parts for the machine. Look for machines that are designed for easy access to components, have clear maintenance guidelines, and are supported by reliable customer service.
Safety Features: Ensure that the machine has appropriate safety features to protect operators during operation. This may include emergency stop buttons, safety guards, or sensors that detect obstructions.
Space and Portability: Consider the size and footprint of the machine, especially if you have limited workspace. Additionally, if portability is a requirement, look for machines that are designed to be easily moved or transported.
Cost and Return on Investment: Evaluate the cost of the machine in relation to its features, capabilities, and long-term value. Consider the potential return on investment based on increased productivity, efficiency, and the reduction of manual labor.
By carefully considering these features, you can select an edge tape machine that aligns with your production requirements, improves efficiency, and delivers high-quality edge finishing results.
Updated on September 12, 2023
How should a Bentley sunglasses case be cleaned and maintained?
To clean and maintain a Bentley sunglasses case, follow these guidelines:
Regular Cleaning: Wipe the exterior of the case with a soft, lint-free cloth to remove dust, dirt, and fingerprints. Avoid using abrasive materials or harsh chemicals that could damage the case’s surface.
Interior Cleaning: Gently remove any debris or lint from the interior of the case using a soft brush or cloth. Ensure that the interior is clean and free from any particles that may scratch or damage the sunglasses.
Mild Soap Solution: If the case is particularly dirty or has stains, you can use a mild soap solution. Dampen a cloth with warm water and a small amount of mild soap, then gently clean the case’s exterior. Make sure to rinse the cloth thoroughly and remove any soap residue before wiping the case.
Drying: After cleaning, allow the case to air dry completely before placing the sunglasses back inside. Avoid using heat sources or direct sunlight to speed up the drying process, as this can damage the case material.
Storage: When not in use, store the Bentley sunglasses case in a cool, dry place away from direct sunlight. Avoid placing heavy objects on top of the case, as it can deform or damage the structure.
Avoid Exposure to Moisture: Keep the case away from excessive moisture or water. Moisture can cause damage to the case’s material, such as warping, discoloration, or mold growth.
Preventive Measures: To maintain the case’s appearance and durability, handle it with clean hands and avoid contact with sharp objects or abrasive surfaces.
Avoid Chemicals: Refrain from using harsh chemicals, solvents, or alcohol-based cleaners on the case, as they can cause discoloration or deterioration of the material.
It’s essential to follow these general care instructions, but always refer to any specific cleaning and maintenance guidelines provided by Bentley or the manufacturer of the sunglasses case, as they may have additional recommendations tailored to the specific materials used.
How does a Bentley sunglasses case protect the sunglasses?
A Bentley sunglasses case is designed to provide protection and safeguard the sunglasses from various potential risks.
Here’s how a Bentley sunglasses case helps protect the sunglasses:
Impact Protection: The case is typically constructed with durable materials that can absorb and distribute impact forces, shielding the sunglasses from accidental drops, bumps, or other impacts that could cause scratches, dents, or breakage.
Scratch Prevention: The interior of the case is often lined with a soft and plush material, such as microfiber or velvet, bentley sunglasses case which helps prevent scratches on the lenses and frames. It creates a gentle cushioning barrier between the sunglasses and the case’s hard exterior.
Dust and Debris Barrier: When the sunglasses are stored in the case, it helps shield them from dust, dirt, and debris that could accumulate on the lenses or frames. This reduces the need for frequent cleaning and minimizes the risk of scratching during handling.
UV Protection: Some Bentley sunglasses cases may come with a UV-protective coating or lining to offer additional protection against harmful ultraviolet (UV) rays. This helps prevent UV damage to the lenses and preserves their optical clarity and performance.
Moisture and Humidity Resistance: The case can provide a protective barrier against moisture and humidity, which can be detrimental to the sunglasses’ materials, such as warping, discoloration, or deterioration. It helps keep the sunglasses dry and in optimal condition.
Secure Closure: Bentley sunglasses cases often feature a secure closure mechanism, such as a zipper, latch, or magnetic closure, to keep the case tightly shut when not in use. This prevents the sunglasses from accidentally falling out and offers additional protection during transport or storage.
Travel Protection: When traveling, a Bentley sunglasses case ensures that the sunglasses are safely stored and protected from potential damage that can occur during transportation, such as being crushed or bent in luggage or bags.
By providing a dedicated and protective storage solution, a Bentley sunglasses case helps extend the lifespan of the sunglasses, maintains their visual appeal, and ensures they are in optimal condition whenever you need to wear them.

Posted on August 25, 2023
Do you have any tips for properly applying metal logo tags?
Here are some tips for properly applying metal logo tags:
Prepare the surface.
Make sure it is clean, dry, and smooth. Remove any dirt, oils, or debris.
Use the right adhesive.
Acrylic adhesives work well for smooth surfaces like metal or glass. Contact cement works for rigid surfaces like wood or plastic.
Apply the adhesive evenly.
Use a small paintbrush or adhesive applicator to cover the entire back of the logo tag.

Allow proper drying time.
Wait the recommended drying time so the adhesive develops full tackiness before positioning the logo.
Position carefully.
Gently set the logo tag in place where you want it, taking time for precise alignment.
Apply firm pressure.
Use your fingertips or a squeegee tool to press from the center out, working any air bubbles to the edges.
Re-apply pressure.
Come back after 10-15 minutes and press again for a stronger bond between surfaces.
Avoid repositioning.
Once adhered, don’t reposition the logo or try to remove it, as this may damage the adhesive bond.
Protect newly applied logos.
Avoid contact, moisture or abrasion until the adhesive fully cures, sometimes 24 hours later.
Taking time with surface prep and proper adhesion steps helps metal logos withstand the elements long-term.
Posted on August 23, 2023
How can I determine the appropriate production capacity of a concrete block machine for my construction project?
Determining the appropriate production capacity of a concrete block machine for your construction project involves considering several factors.
Here are some steps to help you determine the suitable production capacity:
Assess Project Requirements: Start by evaluating the requirements of your construction project. Consider factors such as the expected quantity of concrete blocks needed, the project timeline, and the specific block types and sizes required. This will give you a basic understanding of the production volume you need to meet.
Calculate Daily Block Demand: Determine the daily demand for concrete blocks based on your project timeline and the total quantity of blocks required. Divide the total number of blocks needed by the number of days available for block production. This will give you an estimate of the average daily block demand.
Consider Production Efficiency: Concrete block machines have different production efficiencies, which can affect the actual output. Take into account factors such as machine cycle time, setup time, and any potential downtime for maintenance or repair. Adjust the daily block demand calculated in the previous step to accommodate these factors and determine the effective daily production requirement.
Evaluate Machine Capacity: Review the specifications of concrete block machines you are considering, particularly their production capacity. Machine capacity is typically expressed as the number of blocks produced per day or per hour. Compare the machine’s capacity with the effective daily production requirement calculated in the previous step.
Allow for Flexibility: It’s advisable to allow for some flexibility in the production capacity to cater to unexpected changes or fluctuations in block demand. Consider adding a buffer to your estimated production capacity to account for unforeseen circumstances or increased demand during peak periods.
Consider Future Projects: If you anticipate future construction projects that will require concrete blocks, take those into account as well. It may be more cost-effective and practical to invest in a machine with a slightly higher production capacity if you expect increased demand in the future.
Seek Expert Advice: Consulting with experienced professionals in the industry, such as concrete block machine manufacturers or suppliers, can provide valuable guidance. They can help assess your specific project requirements and recommend the appropriate machine size and production capacity based on their expertise.
By following these steps and considering the project requirements, production efficiency, and expert advice, you can determine the appropriate production capacity of a concrete block machine that aligns with your construction project’s needs.
How can I estimate the buffer or additional production capacity needed for unforeseen circumstances?
Estimating the buffer or additional production capacity needed for unforeseen circumstances in your construction project requires careful consideration of potential factors that may affect block production. While it is challenging to predict all contingencies, here are some steps to help you estimate an appropriate buffer:
Analyze Project Risks: Identify potential risks or factors that may impact block production. These could include delays in material delivery, concrete block machine manufacturer machine breakdowns, weather conditions, changes in project scope, or unexpected increases in block demand. Conduct a thorough risk assessment to understand the likelihood and potential impact of each risk.
Quantify Risk Impact: Evaluate the potential impact of each identified risk on block production. Determine the additional production capacity or buffer required to mitigate the impact of each risk. For example, if there is a risk of machine breakdowns, consider how much additional production capacity would be necessary to compensate for potential downtime.
Consider Contingency Factors: Take into account any existing contingency factors in your project schedule or budget. These contingencies may already include a certain level of buffer for unforeseen circumstances. Assess if these contingencies are sufficient or if additional buffer capacity is needed specifically for block production.
Evaluate Historical Data: If available, review historical data from previous similar projects or industry benchmarks. Analyze the data to identify any common issues or challenges that affected block production in those projects. Use this information to estimate the potential buffer capacity needed for unforeseen circumstances based on past experiences.
Seek Expert Input: Consult with professionals who have experience in concrete block production or construction project management. They can provide valuable insights and advice on estimating the appropriate buffer capacity. Discuss the specific risks and challenges related to block production in your project, and ask for their recommendations on the additional capacity needed.
Flexibility in Production Planning: Consider incorporating flexibility in your production planning. This can involve maintaining a reserve inventory of blocks, adjusting the production schedule to accommodate unexpected events, or having the ability to increase production temporarily if required.
Cost-Benefit Analysis: Evaluate the cost implications of adding buffer capacity. Assess the trade-off between the potential risks and the financial investment required for additional production capacity. Consider the impact on project timelines, labor costs, and overall project budget when making your decision.
Remember that estimating the buffer or additional production capacity for unforeseen circumstances is inherently uncertain. It’s essential to strike a balance between mitigating risks and maintaining cost-effectiveness. Regular monitoring and reassessment throughout the project will help you make necessary adjustments to your production capacity as circumstances evolve.
